HSAddOns
Components
CaseDetails
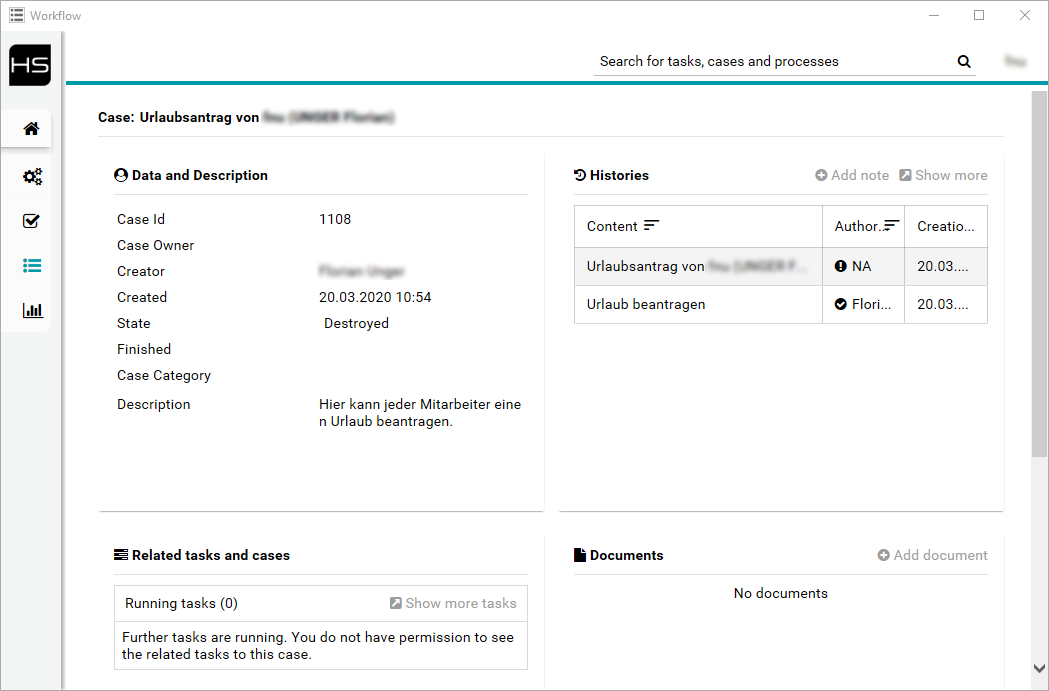
In inPoint a window can be opened via ContextMenu on folders or documents in which all details of the current workflow cases are displayed.
Example: ContextMenu on a document for which there is currently a workflow named "Urlaubsantrag von max (MUSTERMANN Max)".

Then a window opens with the case details:
Configuration
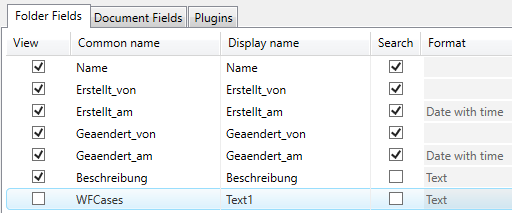
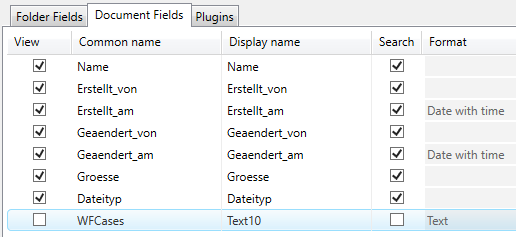
The assigned element format must have a field with the general name WFCases (do not display).
Depending on whether it should work on folders or on documents, the field must be added to the respective folder or document fields.
Folder fields:
Document fields:
After that the context menu is visible for all folders/documents where this element format is assigned.
If no workflow is active, it is displayed as "not active".
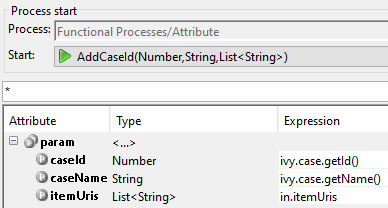
In the workflow process, a function must then be called at the beginning and at the end.
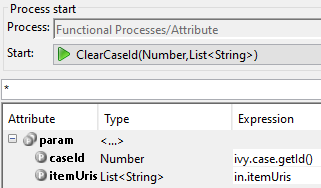
There are two new methods in the "Functional Processes/Attributes":
AddCaseId
Sets the respective Ivy Case ID and description for all passed itemUris.ClearCaseId
Deletes the respective Ivy Case ID for all passed itemUris.
Before the WF Case is assigned to a "User Task" or "Task", a "Subprocess Call" must be executed for the method AddCaseId:
And before the WF ends a "Subprocess Call" for the method ClearCaseId must be executed:
DocumentGrid
To use the "DocumentGrid", the following must be inserted in the respective view:
Add to the namespaces:
xmlns:ic="http://ivyteam.ch/jsf/component"
Where it should be placed:
<ic:at.hs.addon.DocumentGrid
documentItemUris="#{data.documentItemUris}"
newDocTargetFolderItemUri="#{data.targetFolderItemUri}" />
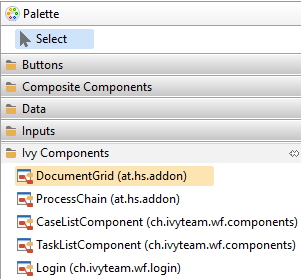
It can also be added with D&D from the "Palette". Under "Ivy Components" the name "DocumentGrid" is shown.
Both parameters are required in the data class for the respective dialog:

documentItemUris
A list with allitemUrito be displayed in the DocumentGrid.newDocTargetFolderItemUri
itemUrithat points to a folder. When new documents are uploaded, thisitemUriis used as the destination. If this value is not set, the button "Upload file" is not displayed!
Example, if newDocTargetFolderItemUri is not set:

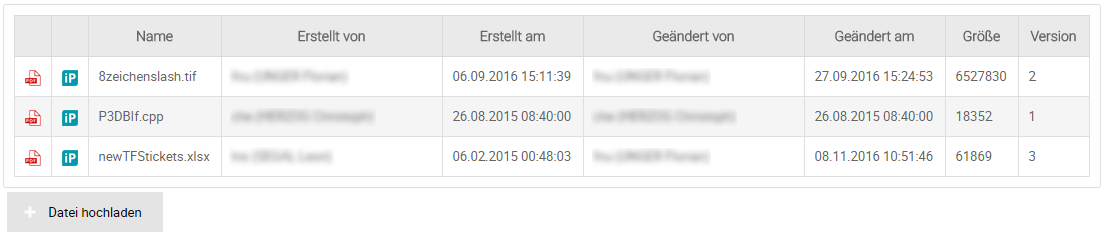
Example, if newDocTargetFolderItemUri is set ("Datei hochladen" button is shown):
DocumentGrid with inPoint.Web Preview
Since inPoint 2018.4 and the associated HSAddOns 7.0.54, it is possible to use DocumentGrid to display a document preview. A new property PreviewURL has been added to the existing class WFDocument. If all documents are retrieved via the HSAddOns, this new property will also be filled with an encrypted inPoint.Web Preview URL. This URL is then used in the workflow to display the preview. All file types that can also be displayed by inPoint.Web are supported!
NOTE: The ivy session user is taken and encoded in the preview URL, which means that this user must exist in inPoint and also must have permissions for the respective itemUri.
In the inPoint server web.config the key WebUrl with the complete inPoint.Web URL must be entered inside the pamSettings.
Also in the web.config inside the pamSettings the key secureParamsSecret must be set to any random value. This value must be identical to the value in the appsettings.json for inPoint.Web and inPoint.Identity!
The used SecureParams also support User Impersonation. To active it, open the inPoint server web.config and change the value for the key WebImpersonate to true. Then the inPoint.Identity Login is never shown! But be aware, if someone else gets the generated link he is able to view the document as well with the impersonated user!
Add the normal DocumentGrid, but three parameters must be added:
<ic:at.hs.addon.DocumentGrid
startMethod="startInPointWebPreview"
documentItemUris="#{data.documentItemUris}"
newDocTargetFolderItemUri="#{data.targetFolderItemUri}"
enableInPointWebPreview="true"
showPreviewAsOverlay="false" />
startMethod
Defines another method with which the DocumentGrid is started.enableInPointWebPreview
Can have the valuestrueorfalse.true
URL for PDF icon per document points to inPoint.Webfalse
URL for the PDF icon per document points to the inPoint.Sync viainpoint:preview.
showPreviewAsOverlay
Can have the valuestrueorfalse.true
When you click on the PDF icon, the preview opens in an overlay panel (PrimeFaces LightBox).false
When the PDF icon is clicked, the preview opens in the integrated "Preview" component. It can also be clicked with the CTRL key pressed, then the preview opens in a new browser tab.
If an integrated preview is desired, the Ivy component "Preview" must be placed at the desired position in the Workflow View.
<ic:at.hs.addon.Preview></ic:at.hs.addon.Preview>
Alternatively you can simply embed an iframe, just set the name of the iFrame to inPointWebDocPreviewIFrame.
<iframe name="inPointWebDocPreviewIFrame" width="100%" height="100%" />
Example, when only DocumentGrid and Preview components are used:
<h:form id="form">
    <div class="p-grid p-dir-col-rev">
        <div class="p-col">
            <div class="box" style="height:600px">
                <ic:at.hs.addon.Preview></ic:at.hs.addon.Preview>
            </div>
        </div>
        <div class="p-col">
            <div class="box">
                <ic:at.hs.addon.DocumentGrid
                    startMethod="startInPointWebPreview"
                    documentItemUris="#{data.documentItemUris}"
                    newDocTargetFolderItemUri="#{data.targetFolderItemUri}"
                    enableInPointWebPreview="true"
                    showPreviewAsOverlay="false" />
            </div>
        </div>
    </div>
</h:form>
CaseNotes
To use the "CaseNotes", the following must be inserted in the respective view:
Add to the namespaces:
xmlns:ic="http://ivyteam.ch/jsf/component"
Where it should be placed:
<ic:at.hs.addon.CaseNote caseId="#{ivy.case.getId()}" />
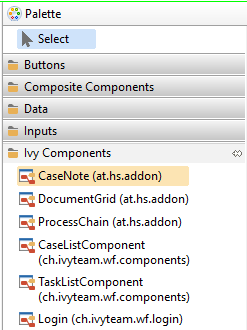
It can also be added with D&D from the "Palette". Under "Ivy Components" the name "ProcessChain" is shown.
Only one parameter is required in the data class for this dialog:
![]()
caseId
Normally always#{ivy.case.getId()}.
No notes:

Add new Note:

Notes added:

Processes
Attribute
To read or set attributes there are some sub processes in the HSAddOns project which can be called easily.
To do this, use the "Call" element under "Activity" from the "Palette".

Select the following in the tab "Process call" at "Process:"
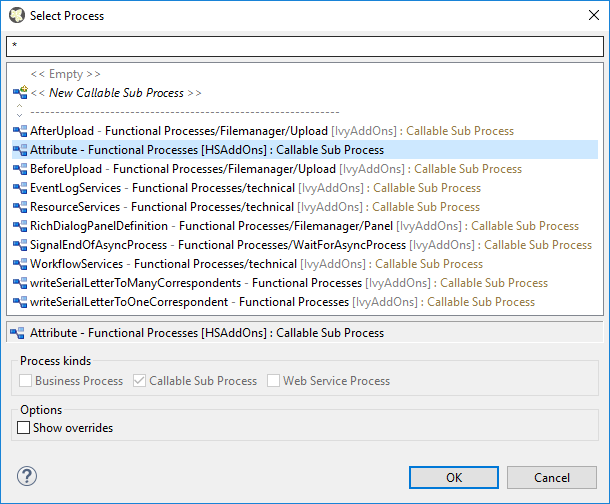
At "Start" the following methods can be selected:
GetAll
Returns all properties of anitemUri.GetMultiple
Returns only properties from anitemUriand a list of property names.GetSpecific
Returns exactly one property from anitemUriand one property name.SetMultiple
Sets multiple property values for anitemUri.SetSpecific
Sets a property value for anitemUri.AddCaseId
Sets theCaseIdwith a name for a list ofitemUri.ClearCaseId
Deletes theCaseIdfor allitemUripassed.
Document
Select the following in the "Subprocess Call" under "Select Process":
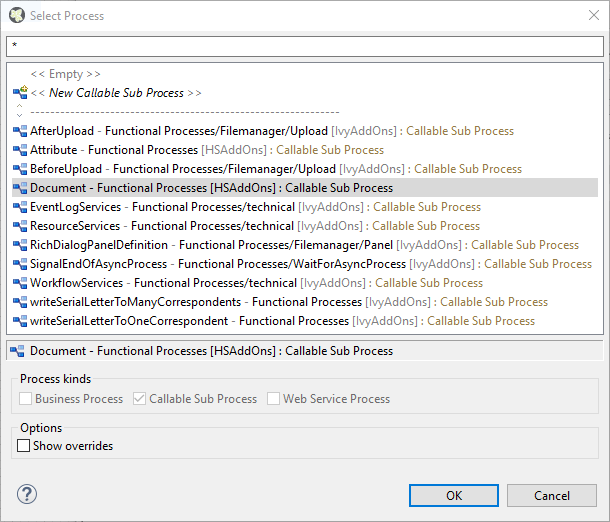
The following methods are available for "Start":
GetDocuments
Returns all documents for a list ofitemUri.- Starting from version 7.0.111 the Axon.ivy username have to be passed! This username is transferred to the WCF Method and user for the previewURL, which is created for each document.
NOTE:inPoint_HSAddOns_DomainNamemust be configured!
- Starting from version 7.0.111 the Axon.ivy username have to be passed! This username is transferred to the WCF Method and user for the previewURL, which is created for each document.
CreateDocument
Archives a file to the specifieditemUriand returns the created documentitemUri.CreateDocumentDifferentUser(7.0.111)
Archives a file to the specifieditemUriand returns the created documentitemUri.- The Axon.ivy username have to be passed! This username is transferred to the WCF Method and user for the previewURL, which is created for each document.
NOTE:inPoint_HSAddOns_DomainNamemust be configured!
- The Axon.ivy username have to be passed! This username is transferred to the WCF Method and user for the previewURL, which is created for each document.
UpdateDocumentChanges a document to the transferred fileUpdateDocumentDifferentUser(7.0.111)
Changes a document to the transferred file- The Axon.ivy username have to be passed! This username is transferred to the WCF Method and user for the previewURL, which is created for each document.
NOTE:inPoint_HSAddOns_DomainNamemust be configured!
- The Axon.ivy username have to be passed! This username is transferred to the WCF Method and user for the previewURL, which is created for each document.
CreateReport
Archives the WF report and links allitemUripassed to the newly created document.UpdateReport
Modifies a WF report and links allitemUripassed to the modified document.CreateReportHidden(7.0.5)
Archives the WF report and links allitemUripassed to the newly created document. The archived report is not visible in the inPoint Client.UpdateReportHidden(7.0.5)
Modifies a WF report and links allitemUripassed to the modified document. The updated report is not visible in the inPoint Client.DeleteDocuments(7.0.5)
Marks all passed documentitemUrias deleted.MoveDocument(7.0.55)
Moves a document to a different folder.- The
nameValuesmust be filled when a document is moved to another folder with a different format set. If certain fields are required, they have to be filled in here.
- The
Report
Select the following in the "Subprocess Call" under "Select Process":
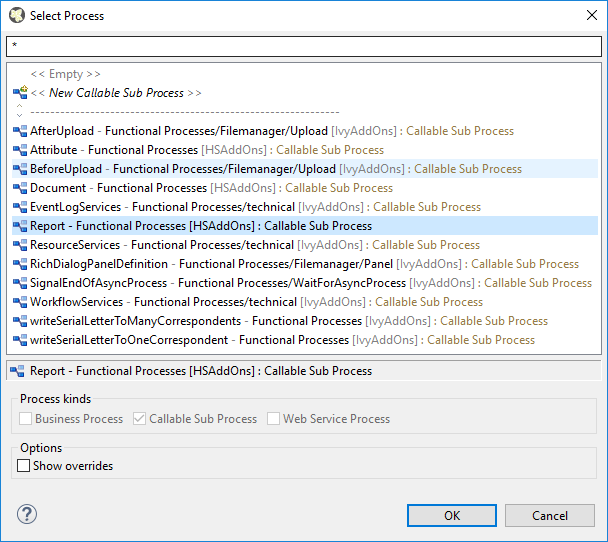
The following methods are available for "Start":
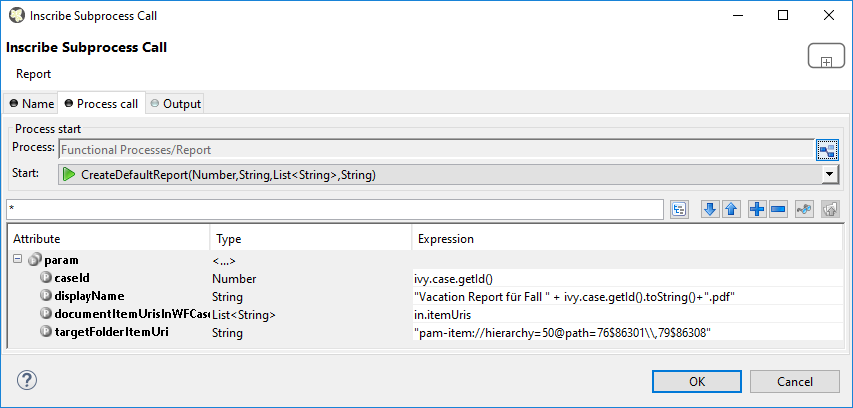
CreateDefaultReport
Creates a report for the current case from an word template and archives it.CreateDefaultReportHidden(7.0.55)
Creates a report for the current case from an word template and archives it. The archived report is not visible in the inPoint Client.CreateDefaultReportAction(7.0.55)
Creates a report for the current case from an special word template (date, comment, user, pressed button) and archives it.CreateDefaultReportActionHidden(7.0.55)
Creates a report for the current case from an special word template (date, comment, user, pressed button) and archives it. The archived report is not visible in the inPoint Client.
NOTE: The language in which the reports should be created can be changed with the global variable called inPoint_HSAddOn_Locale. Default is de, currently only en as other value is supported!
Example call:
Security
In the "Subprocess Call" under "Select Process" select the "Security" process.
The following methods are available for "Start":
GetRights
Returns all permissions set on the passeditemUri.SetRights
Sets all passed permissions on the passeditemUri.itemUriitemUrifrom folder or document.removeChildrenRightsIf "true", the permissions are applied to all sub-folders.rightsList of permissions to be set.
NOTE: The communication user should always be listed here with all permissions, otherwise it can happen that no one has access anymore!
In the class ItemRight, only the userId or only the groupId or both can be set.
The EnumSet rights, can be initialized like this:
- All permissions
EnumSet.allOf(ItemAllowedRights.class); - Specific permissions
EnumSet.of(ItemAllowedRights.FolderRead,ItemAllowedRights.FolderEditReminder,ItemAllowedRights.DocumentRead,ItemAllowedRights.DocumentModify);
Share
In the "Subprocess Call" under "Select Process" select the "„Share" process.
The following methods are available for "Start":
ShareFolder
Shares a folder with one or more groups/users.makeShareNameUnique
If theshareNamepassed is not unique, the server itself can generate a unique name.itemUri
itemUrifrom the foldershareName
Name to use for the share.folderPermissions
Rights for users/groupsshareForever
If "true", the share will be valid forever.shareUntil
Until when this share should be valid.disableMailNotification(7.0.110)
If "true", no mail is sent to the users/groups.
ShareDocument
Shares a document with one or more groups/users.makeShareNameUnique
If theshareNamepassed is not unique, the server itself can generate a unique name.itemUri
itemUrifrom the documentshareName
Name to use for the share.documentPermissions
Rights for users/groupsshareForever
If "true", the share will be valid forever.shareUntil
Until when this share should be valid.disableMailNotification(7.0.110)
If "true", no mail is sent to the users/groups.
RemoveShare
Ends sharing a folder or document.
NOTE: The passeditemUrimust contain the "share" part!
inPoint.Core REST
This section describes how to use the inPoint.Core REST interface.
inPoint.Core must be installed and configured with a valid certificate. Furthermore the Basic Authentication must be activated and configured.
Documentation from Axon.ivy: Axon.ivy Designer REST Clients
In the Axon.ivy Designer in the respective project from which REST calls are to be made, click on "Rest Clients" under "Definitions".
Then click on "Add Client" and enter "inPoint.Core" as the name. (Can also be named differently)
After clicking on "Finish" the REST Client can be configured.
The URL to the inPoint.Core server must be entered for the URI. Should start with https!
For authentication, select "HTTP Basic" and enter the username/password (as configured in the appsettings.json).
Depending on where in the process a REST call is to be made, simply add the "REST Client" (under "Activity") and open it with a double click.
To make all further settings, I recommend to open the inPoint.Core Swagger website.
The Swagger contains all necessary information + interface documentation!
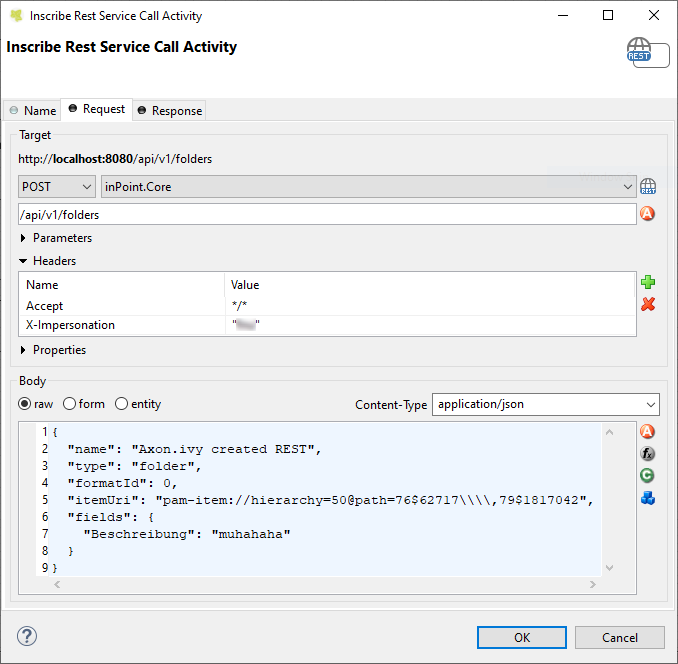
Example: Creating a new folder

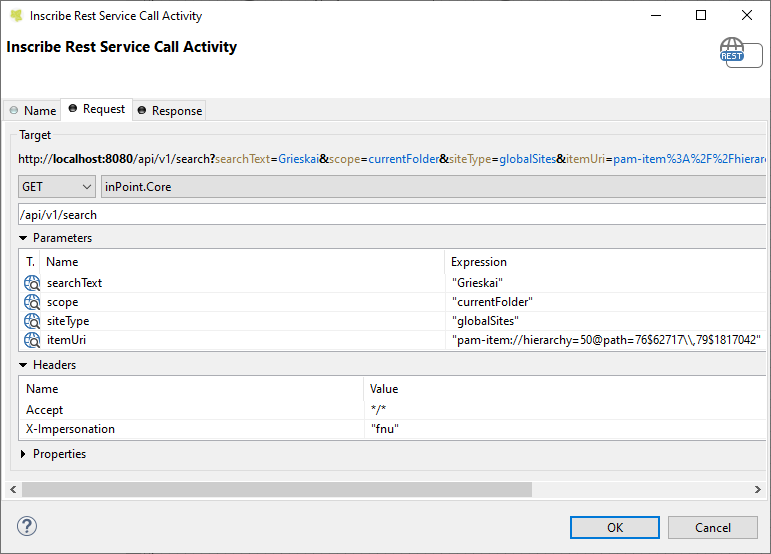
Example: Full text search with "simple search"
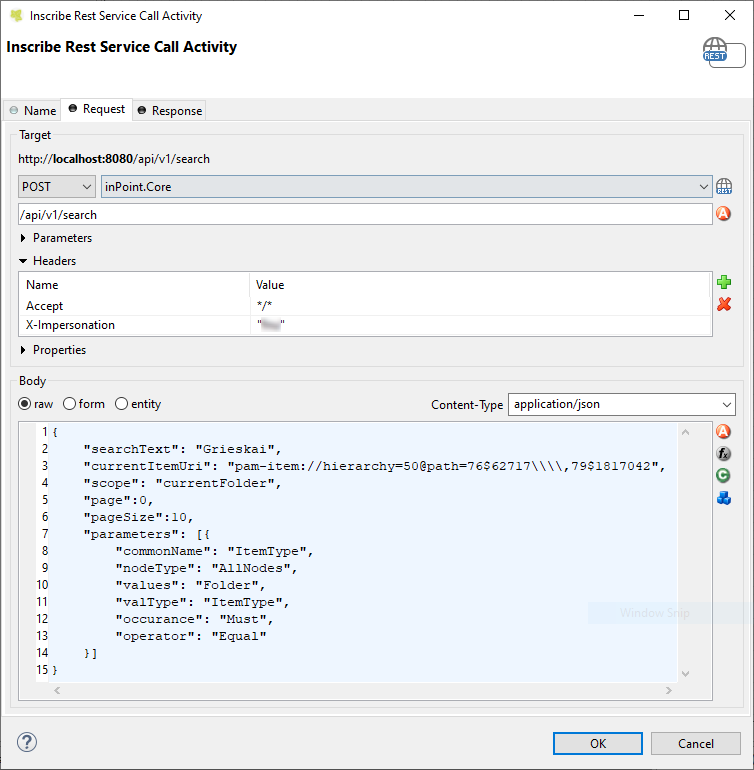
Example: Full text search with "advanced search"
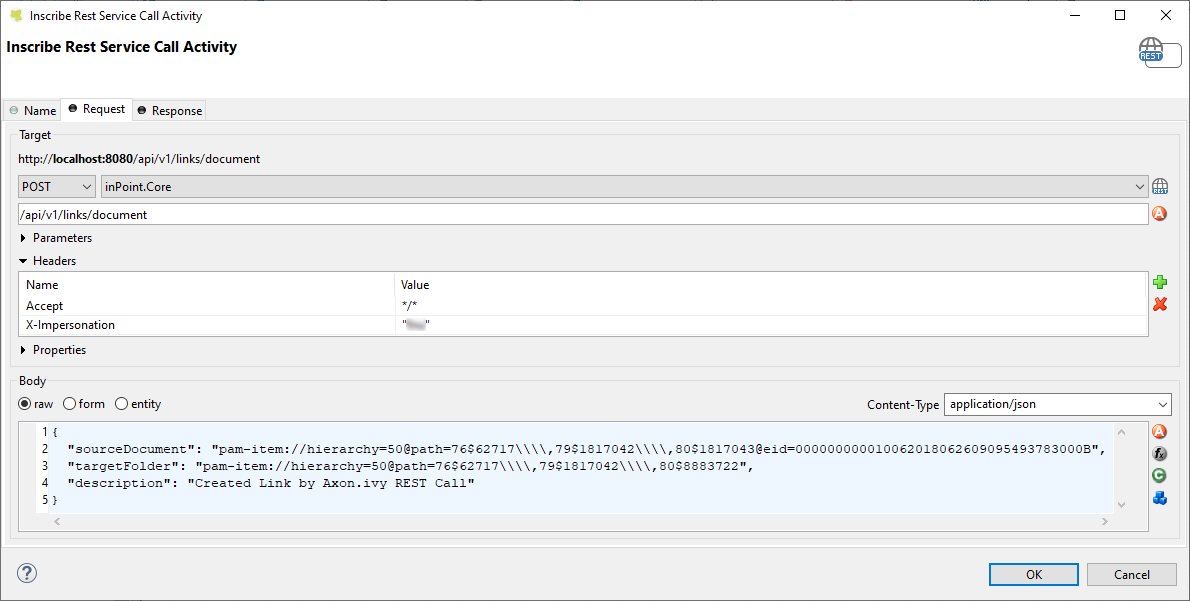
Example: Linking a Document
Helpful tips
If an itemUri is entered in the "Body" as "raw", the \, must be written with \\\\,. (See screenshot)
Each response can be parsed as String and JsonNode.
The JsonNode class has some helper methods to read values from the JSON.
But if you want the complete response to be available as a class, there is an easy way:
- Read and copy the result once as string JSON format
- Use jsonschema2pojo, copy the JSON into it and create Java classes.
- Create the Java Classes in Axon.ivy
- Select the generated class in the "Response" tab at the top right.
Then you can simply access the properties of the class!
Start a Workflow with WCF
If a workflow should be started via Pam4ERP. Then a "Signal Start" event must be used in the WF.

The signal code is always composed of: at:hs:addon:startworkflow:+name of the WF.
If a WF is started by SAP, then there is a parameter "wfName" which must pass this "name of the WF".
For example:

In the output code the SignalData can be accessed with:
import at.hs.addon.StartWorkflowData;
StartWorkflowData data=signal.getSignalData() as StartWorkflowData;
StartWorkflowData' is defined as follows:

NOTE: A User Dialog at the WF start is then not possible!