inPoint.Client (Standalone)
Admin - General Settings
All Settings are so called CascadingSettings, which means that for each setting different Levels are possible to be configured.
Levels top down:
Default
Values are set by the system and can not be changed.Admin
Values can be configured in theAdminWindow underGeneral Settings, left bottom DropDownAdmin.Tenant
Values can be configured in theAdminWindow underGeneral Settings, left bottom DropDown the specific Tenant.Site
Values can be configured for each Global Site, Context menuGlobal Site Administration.Format
Values can be configured for each Format, in theField SelectionWindow underSettings.Folder
Not used yet.User
Values can be configured in the Settings Window.UserSite
Not used yet.UserFormat
Not used yet.UserFolder
Not used yet.
If the Value for one Setting is evaluated, its always done bottom up.
For Example: One Setting has been configured for the Levels Admin, Tenant and Format. The Folder where the Format is applied will have the Setting Value from the Level Format, but all other Folders will have the Value from the Level Tenant. Also it could be that there are more Tenants and the Setting is just configured for one, so all others will get the Value from the Admin Level.
E-mail
All E-mail or Outlook related Settings can be configured here.
Open Assignment dialog after E-mail was sent
Default: unchecked
Levels: Admin, Tenant, User
When inPoint is used in Outlook and this settings is activated, for each E-mail which was sent the Assignment Window with the sent E-mail will be opened.
Do not open for Domains
Default: empty
Levels: Admin, Tenant, User
If Open Assignment dialog after E-mail was sent is checked and for some Domains the Assignment Window should not be opened, here a list of multiple Domains can be specified (allowed separators ';', ',', ' ').
For Example: gmail.com;gmx.at
Category after Assignment
Default: empty
Levels: Admin, Tenant, User
When an E-mail is archived per Drag&Drop in Outlook or using the Assignment Window, after the archiving completed this setting can add Categories to the E-mail in Outlook.
For Example: archived
Configure in Outlook for this word a specific Color, to be able to see which mails are archived.
NOTE: It is possible to specify multiple Categories. See: MailItem categories Microsoft Outlook to find out the correct separator.
Email restore search environments
Default: empty
Levels: Admin, Tenant
If the Customer have two different inPoint Systems, one for DMS and one for E-mail archiving and the Users are manually archiving already contentACCESS archived E-mails from Outlook to inPoint. inPoint does recognize that the E-mail is just a stub and tries to restore it, because the E-mail archiving is on a separate System the original E-mail will never be found. For this specific case there is this setting, where additional inPoint Environments (In the Windows Registry under ..\HS Europe\inPoint\Environment\) can be configured (only allowed separator is ',').
NOTE: The User must exist and must have the needed rights in both Systems for the specific E-mail!
RSS Feeds
Every User can subscribe to Folders and Documents (Right click it and then select "Subscribe" in the Context menu). New and Expired Reminders, New and Expired Shares will automatically be included in the Feed.
The Subscriptions can be managed by the User in the Settings Window under the Subscriptions tab.
For each Folder subscribed the following changes are included:
- New/Edited Subfolders
- New/Edited Documents in any Subfolders
The Feed URL can be added to any RSS Feed Reader, we are recommending using Microsoft Outlook.
Right click in Outlook on the RSS-Feeds Folder and select Add a New RSS Feed.... Paste the Feed URL, click OK and then Yes. Outlook does check automatically for updates and shows new Feed Entries in the created Feed Folder.
Build the URL
The Feed can be retrieved from inPoint.Core. Make sure inPoint.Core is reachable from all Users which want to use it!
First get the inPoint.Core URL (for example: http://<host>:8080) and add the Endpoint /api/v1/feeds.
The following Query Parameters are possible:
days
How many days back the Feed should include items. Either this value is set orfrom/tocan be used.from
Whendaysis not set, then thefromcan be defined asstringhere.to
Whendaysis not set, then thetocan be defined asstringhere.format
If empty, then the Feed is returned usingRss20FeedFormatter. Possible value van beatom, then the Feed is returned usingAtom10FeedFormatter
For example a complete URL could be:
https://<host>:8443/api/v1/feeds?days=180https://<host>:8443/api/v1/feeds?from=01.01.2020&to=01.06.2020&format=atom
RSS Feed Configure HTTPS connection
The following lines should be added to the web.config if "RSS FEED" should be reachable via https:
<service behaviorConfiguration="UnifyWCFBehavior_wia" name="Pam.Unify.WCF.UnifyWcf">
	<endpoint address="/feed" binding="webHttpBinding" bindingConfiguration="wbBind_ssl" behaviorConfiguration="RESTFeed" contract="Pam.Unify.WCF.IUnifyFeed" />
</service>
<webHttpBinding>
	<binding name="wbBind_ssl">
		<security mode="Transport">
			<transport clientCredentialType="Windows" proxyCredentialType="Windows" />
		</security>
	</binding>
</webHttpBinding>
Purge Request
This settings control the client side of the Delete Forever (GDPR) feature. It allows users to create a purge request and add documents or folders to it, either by direct selection or by executing a full-text search.
Configuration
Configure a Base Folder
The base folder for purge request must be in a global site. To configure a folder it is necessary to enable a special the menu item and execute it for the chosen folder. Afterwards the menu item can be hidden again.
Enable the special command
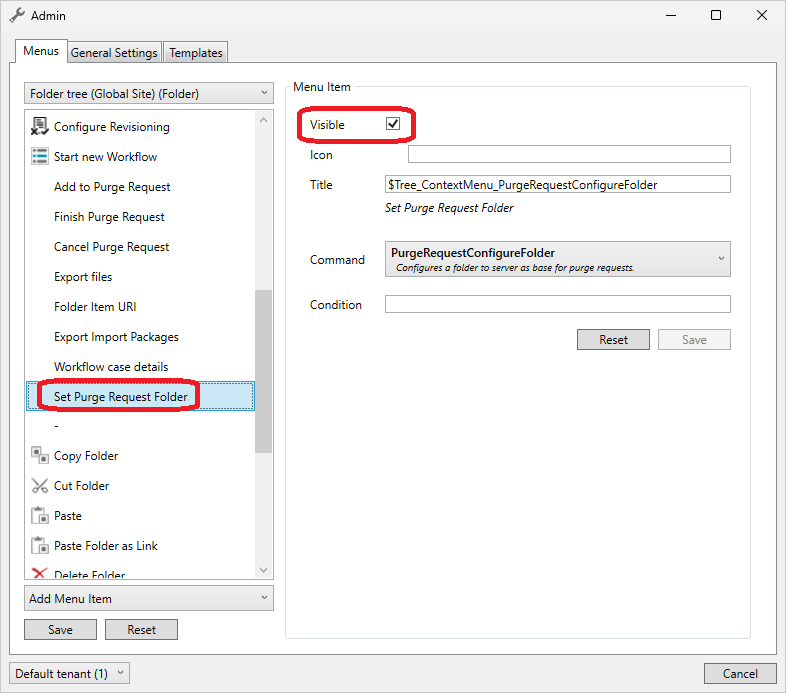
Go to "Admin" - "Menus" - edit the menu for "Folder tree (Global Site) (Folder)", there is a entry called "Set Purge Request Folder" which executes the command "PurgeRequestConfigureFolder".
Make the command visible by checking the box, which makes it visible to administrators.

Configure a base folder
Create a folder in a global site and execute the action "Set Purge Request Folder". This will create an element format which displays the purge request and also ensure that the required lookups for the format are existing. Finally it will set the cascading setting which stores the folder.
Hint
It possible to execute the function later to re-create or fix the format. If there are already existing purge requests the format has to be applied manually.
Configure a Confirmation Workflow
When a user to finishes a purge request an optional confirmation workflow in Axon-Ivy can be started. Go to "Admin" - "General Settings" - "Purge Request" and enter the workflow start node. This is a customer generated workflow, which at the end must set the status of the workflow to "ConfirmationOK"
Example:
Confirmation/157228106E0DCCDE/start.ivp
Configure an Audit Folder
After a purge request was executed by the Job an audit log will be placed into this directory. Go to "Admin" - "General Settings" - "Audit Folder" and enter the itemUri of a folder..
Example:
pam-item://hierarchy=50@path=76$8902051\,79$8902053
Enable the Job
The job "inPoint.PurgeJob" is disabled by default! Use inPoint.Admin to enable it and also define the scheduling required.
Monitoring
The job will process the list of purge requests in the background. The state of the job can be managed with inPoint.Admin.
Execution
Create/Add to a Purge Request
A user starts a purge request by using the action "Add to Purge Request" which is available for folder documents and full-text searches. This will find the current purge request of the user or create a new one, then it will add the selected documents or folders to it.
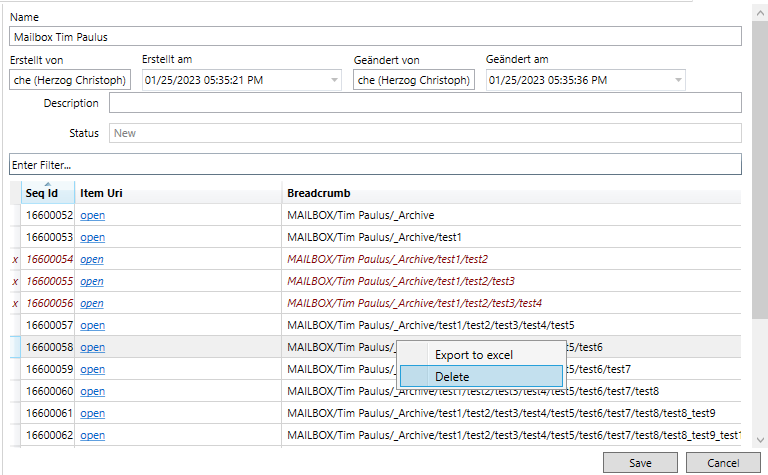
When a user views the purge request he or she can also remove items using the context menu in the grid.
At any time a user can have no more then one purge request active. To create a new one, the user must either cancel or finish the current request.
Security
The new folder is only visible to the user who created it and to the site owners of the base folder.
Remove items from a Purge Request
To remove items from the request simple select the items in question then right click and use delete, then click on save to persist the changes.

Finish the request
If the user has finished adding and removing items from the request the request has to be confirmed. Either by using a workflow or by confirmation from an administrator. To start the process the user has to select the request and execute "Finish Purge Request".
This will set the state of the request to "ConfirmationPending" and forbid any further editing.
Cancel the request
As long as the request is not started the user can simple cancel the request by executing "Cancel Purge Request"
inPoint.Config
This configuration file is located at %APPDATA%\inPoint\inPoint.config
and is written by the standalone client when clicking the OK-Button in the
Settings window.
It looks like:
<?xml version="1.0"?>
<UnifyConfiguration xmlns:xsd="http://www.w3.org/2001/XMLSchema" xmlns:xsi="http://www.w3.org/2001/XMLSchema-instance">
  <WCFTracingEnabled>false</WCFTracingEnabled>
  <IgnoreCompatibility>false</IgnoreCompatibility>
  <WebServiceTimeoutSeconds>300</WebServiceTimeoutSeconds>
  <IgnoreTerminalSession>false</IgnoreTerminalSession>
  <PreviewType>WebBrowser</PreviewType>
  <AlternateMirrorForLongPathNames>disabled</AlternateMirrorForLongPathNames>
  <EnvironmentName>default</EnvironmentName>
  <Language>en</Language>
</UnifyConfiguration>
WCFTracingEnabledset Set to true to enable tracing for all
WCF calls.
IgnoreCompatibility Set to true to ignore the version
check for the server.
WebServiceTimeoutSeconds Set to define a higher
connection timeout than the default of 5 minutes.
IgnoreTerminalSession When running in a remote session,
offline sync is disabled. Set this to true enabled
offline sync also for remote sessions.
PreviewType Currently only WebBrowser is supported.
AlternateMirrorForLongPathNames Controls the limitation for
245 characters for filenames and paths. The value is updated from the
server-setting AlternateMirrorForLongPathNames and used by inPoint.Sync
when offline.
Possible values are:
enabled: Server-settingAlternateMirrorForLongPathNamesis set (long filenames are enabled).disabled: Server-settingAlternateMirrorForLongPathNamesis cleared (long filenames are disabled).false: Value from an old client; On startup this will be changed into the value from the server (enabledordisabled).true: Value from an old client; On startup this setsAlternateMirrorForLongPathNameson the server and will be changed intoenabled.
EnvironmentName The selected environment.
Should be selected from the Settings window.
Language The selected language.
Should be selected from the Settings window.