Getting Started
Requirements
Server
- Windows Server 2012 R2[*]admin-troubleshooting.md#error-err_http2_inadequate_transport_security), Win10, Windows Server 2016 or higher
- .NET 6
- A working locally installed inPoint.Client (for the Environment Registry keys or inPoint.Config)
- SSL Certificate
- Two Free ports (do not use 443 if you already run IIS with it!)
Client
- Browser:
- Chrome v123 or higher
- FireFox v123 or higher
- Safari v17.4 or higher
- Edge v122 or higher
- Opera v108 or higher
- OS: Windows, OS X, iOS (iPhone and iPad) and Android
Note: You can update outdated Browers via updateoutdatedbrowser.com
External Access
If you are planning to access inPoint.Web from an external network (i,e. Internet), you need to:
- have a valid Certificate from a known CA (otherwise the browsers will complain)
- setup your firewall to allow access to both ports (identity and web)
License (.lic)
inPoint.Web has it's own "licensing module", as such an updated .lic file must be created (by Backoffice) and placed (manually) usually directly under c:\Program Files(x86)\HS Europe
If the license is invalid for any reason (expiration, network ip, module, etc...) you will see an "Invalid inPoint License" both on the server-side logs and on the Client directly in the About page (last entry in the Sidebar). It will for now not limit any functionality, but this will change in the future.
Installation
inPoint.Web.Server is basically the REST Service used by the inPoint.Web Client. It is in itself a client (just like inPoint.Client), that's why it requires a working locally installed inPoint.Client.
inPoint.Identity is used to (only) authenticate users (by supporting different Login Providers) using the standard OpenID Connect.
There are two separate install packages:
- inPoint.Web.IdentityServer_20XX.X.X.X.msi
- inPoint.Web.Server_20XX.X.X.X.msi
These are "self-hosted" Web Servers (based on Http.Sys) and do NOT require any IIS installation/Configuration. The installation will install everything under C:\Program Files\(x86)\HS Europe and install them as Services.
NOTE: you can either install them on the same machine or on two totally separate ones.
You MUST then manually edit C:\Program Files (x86)\H&S Heilig und Schubert Software AG\Pam.Storage\Web\web.config (or wherever it's located) and set pamSettings/identityAuthority to point to the Identity server.
Per default the installed Services will run under the "Network Account". You can manually change that to an existing inPoint User, then you must manually add this user to the Pam.Storage/web/web.config ImpersonationUsers setting.
NOTE: only Install/Remove are currently implemented, Change/Repair will do nothing – so if you need to change any settings simply first manually uninstall and then re-install with the new settings.
Installation in custom folder
Per default the Setups will install under:
C:\Program Files\(x86)\HS Europe\inPoint.Web.Server
and
C:\Program Files\(x86)\HS Europe\inPoint.Web.IdentityServer
If you wish to install under a different path you can specify that on the first setup dialog or specify those using standard MSI CLI parameters when executing the installer (this will still show the Installer GUI), e.g:
msiexec.exe /I inPoint.Web.IdentityServer_20XX.X.X.X.msi installdir="D:\inPoint\inPoint.Web.IdentityServer"
msiexec.exe /I inPoint.Web.Server_20XX.X.X.X.msi installdir="D:\inPoint\inPoint.Web.Server"
NOTE: For silent install you must specify the full target folder in the installdir parameter!
inPoint.Web.IdentityServer
-
Select your destination folder,
-
Enter the full qualified hostname and select your certificate,

-
Enter inPoint.Core and inPoint.Web URL
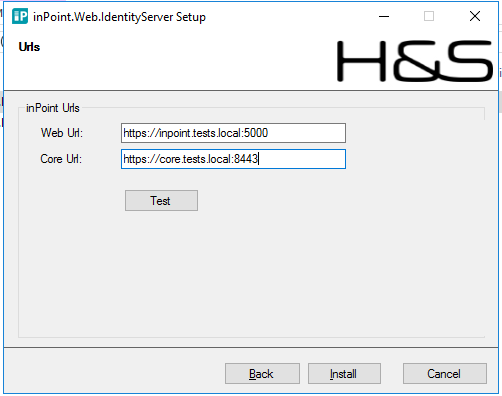
After the installation you should have a running inPoint.Web.IdentityServer Windows Service, and if configured correctly it should be accessible at https://<host>:<IdentityPort>
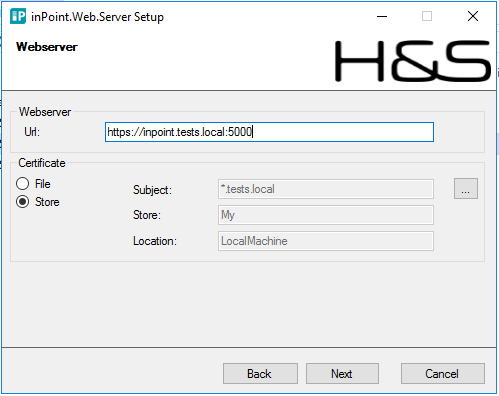
inPoint.Web.Server
-
Select your destination folder,
-
Enter the full qualified hostname and select your certificate,
-
Enter inPoint.Identity URL
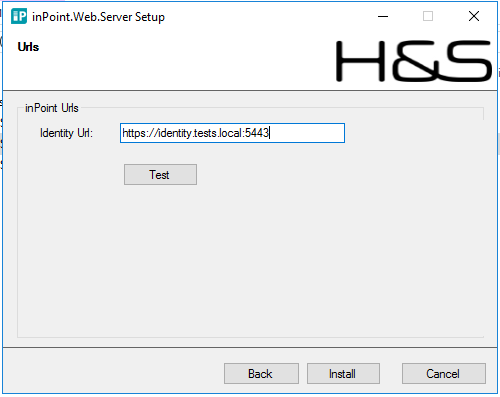
After the installation you should have a running inPoint.Web.Server Windows Service, and if configured correctly it should be accessible at https://<host>:<WebPort>
Registry
All values entered in the setup (except for the password) are persisted in the Registry under:
HKLM\Software\HS Europe\inPoint.Web
HKLM\Software\HS Europe\inPoint.Web.IdentityServer
Those values are used ONLY by the Setup(s).
Silent Installation
Silent installation (without any GUI intervention) is also possible by providing an "install.json" file with the parameters pre-filled.
install.json
CONFIG: full filename (including path) to install.json
Here a sample install.json for inPoint.Web.Server:
{
  "SERVERURL": "https://inpoint.web:3000",
  "CERTSTORE": "My",
  "CERTLOCATION": "LocalMachine",
  "CERTSUBJECT": "*.inpoint.web",
  "IDENTITYURL": "https://identity.inpoint.web:5000",
}
Here a sample install.json for inPoint.Web.IdentityServer:
{
  "SERVERURL": "https://identity.inpoint.web:5000",
  "CERTSTORE": "My",
  "CERTLOCATION": "LocalMachine",
  "CERTSUBJECT": "*.inpoint.web",
  "WEBURL": "https://inpoint.web:3000",
  "COREURL": "https://core.inpoint.web:8443",
}
Alternatively you can use a locally stored certificate and its password:
{
  // other config from above replace any CERT* keys with
  "CERTPATH": "C:\\path\\to\\certificate.pfx",
  "CERTPASS": "cleartext-password",
}